
Introduction
Cacti is a great tool for monitoring devices on you network through SNMP. One common request is how do I get Cacti to SMS me when soemthing goes wrong? Hopefully this tutorial will walk you through getting everything up and running. At the moment this will allow you to receive an SMS for dead hosts. In another tutorial I’ll extend it to also work with thresholds.
These instructions are known to work with a fresh install of Cacti EZ. Originally this tutorial used CactiEZ v0.6, but now 0.8 is available. I haven’t tested the instructions with 0.8 but I have provided the download link here:
http://cactiez.cactiusers.org/download/
This setup will use an open source command line program called Gnokii. Basically it allows you to communicate to mobile phones via the command line. There are many phones supported. To find out more please visit their homepage gnokii.org.
I’ll be using an old Nokia 6070 with a CA-42 cable. These can be picked up really cheap now on ebay. My whole setup with cable and phone only cost $27. Most Nokia phones are supported. Gnokii even supports Bluetooth.
Installing Gnokii
The following instructions will tell you how to get Gnokii installed on a CactiEZ installation.
First ssh into new install of cactiez:
ssh root@ip-of-cacti-ez
The password will be CactiEZ
Lets move to the tmp directory to download some stuff:
cd /tmp
Download the latest installation of Gnokii. In our case it was 0.6.30. Please visit the gnokii website to find the most recent version for you.
wget http://www.gnokii.org/download/gnokii/gnokii-0.6.30.tar.gz
Untar and unzip the archive:
tar xvfz gnokii-0.6.30.tar.gz
Change into the created directory:
cd gnokii-0.6.30
Now we will simply try to follow the installation instructions found on the Gnokii website:
./configure
You’ll notice an error straight away:
configure: error: in `/tmp/gnokii-0.6.30′:
configure: error: no acceptable C compiler found in $PATH
See `config.log’ for more details
GCC
Gnokii is telling us it needs a C compiler. I suppose CactiEZ does not ship with one, so lets install one:
yum install gcc
Select Y when asked if it’s OK to download
Once that installs lets try again:
./configure
We get a new error:
checking for intltool >= 0.35.0… ./configure: line 5826: intltool-update: command not found
configure: error: Your intltool is too old. You need intltool 0.35.0 or later.
Let’s use yum to install intltool:
yum install intltool
Once that installs lets try again (you can skip this if you want, it’s just to show you the process I went through):
./configure
Intltool
Still the same error. But at least yum has installed the dependencies needed for intltool. Now we’ll manually upgrade intltool by downloading the latest version:
cd /tmp
wget http://launchpad.net/intltool/trunk/0.41.1/+download/intltool-0.41.1.tar.gz
tar xvfz intltool-0.41.1.tar.gz
cd intltool-0.41.1
Let’s install the new version of intltool using the instructions from:
http://www.linuxfromscratch.org/blfs/view/cvs/general/intltool.html
./configure --prefix=/usr
make
make install
install -v -m644 -D doc/I18N-HOWTO /usr/share/doc/intltool-0.41.1/I18N-HOWTO
And we’ll try installing Gnokii again:
./configure
This time the error outputs:
configure: error: in `/tmp/gnokii-0.6.30′:
configure: error: The pkg-config script could not be found or is too old. Make sure it is in your PATH or set the PKG_CONFIG environment variable to the full path to pkg-config.
Alternatively, you may set the environment variables GLIB_CFLAGS and GLIB_LIBS to avoid the need to call pkg-config. See the pkg-config man page for more details.
To get pkg-config, see <http://pkg-config.freedesktop.org/>.
See `config.log’ for more details
pkg-config
Lets move back to the tmp directory to download pkg-config:
cd /tmp
wget http://pkgconfig.freedesktop.org/releases/pkg-config-0.25.tar.gz
tar xvfz pkg-config-0.25.tar.gz
cd pkg-config-0.25
./configure --prefix=/usr
make
make install
And we’ll try installing Gnokii again:
./configure
configure: error: Package requirements (glib-2.0) were not met:
No package ‘glib-2.0’ found
Consider adjusting the PKG_CONFIG_PATH environment variable if you installed software in a non-standard prefix.
Alternatively, you may set the environment variables GLIB_CFLAGS and GLIB_LIBS to avoid the need to call pkg-config.
See the pkg-config man page for more details.
Glib-2.0
Fortunately glib-2.0 has a yum package that we can install:
yum install glib2-devel
Installing Gnokii
OK everything should be ready to go now to install Gnokii. Let’s give it a try:
cd /tmp/gnokii-0.6.30
./configure
gmake
gmake install
Now Gnokii is installed but we have a few more things to do before we’re done.
Configuring Gnokii
Gnokii needs a configuration file before it will work with your mobile phone. You can get a list of config files and phones from the Gnokii website:
http://wiki.gnokii.org/index.php/Config
The config file will be can be put in the users home folder using the file name .gnokiirc
touch ~/.gnokiirc
Before we create our config file we need to find out what port our phone is connected to.
dmesg | tail
usb 4-1: new full speed USB device using address 6
drivers/usb/class/cdc-acm.c: Ignoring extra header
drivers/usb/class/cdc-acm.c: This device cannot do calls on its own. It is no modem.
cdc_acm 4-1:1.0: ttyACM0: USB ACM device
The main bit of info we’re interested in is the ttyACM0. Yours may say something different. This is the value we’ll use for the port variable in the config file.
Then use your favourite text editor to edit the file. We’ll use vi because it comes with the CactiEZ installation:
vi ~/.gnokiirc
Insert the text for your config. In my case I found a working config on the website for the Nokia 6070:
[global]model = 6510
port = /dev/ttyACM0
connection = serial
To Use vi press ‘i’ to insert new text. To save the file and leave vi, type ESC+:+x (press ESC key, type : followed by x and [enter] key).
I will change the permissions on this file since the apache user group will need to access these files.
chmod 777 ~/.gnokiirc
chmod 777 /dev/ttyACM0
Testing it out
Now we need to test out our configuration. Plug in your phone to the computer, or if your using bluetooth make sure it’s paired. First we’ll ask Gnokii to identify the connected phone:
gnokii --identify
Be patient. This could take a minute or two. Once it finishes you’ll get an output looking something like this:
IMEI : xxxxxxxxxxxxxxx
Manufacturer : Nokia
No flags section in the config file.
Model : RM-166
Product name : RM-166
Revision : V 04.22
This means everything is all good. Let’s try and text someone.
echo "Hi this is the computer" | gnokii --sendsms +15555552233 -r
If you get a text it means we’re all good to go. Now we just have to tell Cacti how to use our new SMS capabilities.
Modifying Cacti
CactiEZ comes with an alerting and threshold plugin installed. This plugin on its own can email us with dead host notifications or when thresholds are exceeded. We need to find these files and add a line of code telling them to also shoot out a text message. Also we’ll need to add a config variable so that we can add mobile phone numbers through Cacti’s web based interface. Here’s the files we’re wanting to change:
/var/www/html/plugins/thold/cli_thresholds.php
/var/www/html/plugins/thold/includes/settings.php
/var/www/html/plugins/thold/includes/polling.php
Modifying the files
The easiest method is to just overwrite the files with ones I’ve already created. Let’s also make sure to backup the old ones in case anything goes wrong. Download and unzip the modified files:
cd /tmp/
wget https://nickv.codes/resources/cacti.zip
unzip cacti.zip
cp /var/www/html/plugins/thold/cli_thresholds.php /var/www/html/plugins/thold/cli_thresholds.php.old
cp /var/www/html/plugins/thold/includes/settings.php /var/www/html/plugins/thold/includes/settings.php.old
cp /var/www/html/plugins/thold/includes/polling.php /var/www/html/plugins/thold/includes/polling.php.old
mv cli_thresholds.php /var/www/html/plugins/thold/
mv settings.php /var/www/html/plugins/thold/includes/
mv polling.php /var/www/html/plugins/thold/includes/
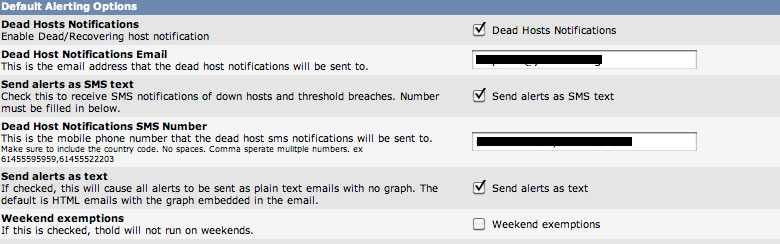
Settings in Cacti
Go to ‘Settings‘ under the ‘Configuration‘ heading in the left menu. Click on ‘Alerting/Thold‘. You’ll see a few new options below. In order for this to work you must have dead host notifications and Send alerts as SMS text enabled. Then put write in your phone number in the Dead Host Notifications SMS Number text box. Make sure you include your country code in the phone number as this helps to reduce possible problems down the road. Here in Australia the number would look something like this:
61455555555
If you need to send to multiple phones just comma separate them with no spaces in between.
Well that’s it! Now you just need to test it out. Go and unplug a host that you’re currently monitoring and you should get a txt within a couple of minutes (remember the poller only runs every 2 mins or so). Also make sure that if the phone attached to the cacti machine gets unplugged or the machine gets restarted you’ll have to chmod it’s port again back to 777.